Centre Guidance
Our guidance documents and videos provide comprehensive information to help you use SOLAR effectively. Whether you’re a new user in need of step-by-step instructions or an experienced user looking for tips and insights, our guidance materials are here to assist you.
Before delivering any SOLAR assessments in your centre, you must read the SOLAR Centre Operating Guide. This guide outlines the procedures for centres delivering assessments using SOLAR, the principles on which SOLAR is managed, and the roles and responsibilities of both SQA and centres.
To access SOLAR, you will need a SOLAR user account. If you do not have one, please contact your Centre SOLAR Co-ordinator to have an account created.
For further information or support, please refer to the Frequently Asked Questions on the SOLAR website or contact the Digital Assessment Services Helpdesk. You can contact the Helpdesk in the following ways:
- Complete the Digital Assessment Services Helpdesk Support Form
- Email: das.helpdesk@sqa.org.uk
The sections below provide access to our guidance materials.
User Guides
Candidate Creation and Editing
Learn how to create, find, and edit candidates in SOLAR, as well as how to add and remove subjects for them.
Candidates entered via SQA Connect or via a centre's own management information system for units in specific qualifications will be automatically created in SOLAR and must not be manually created. This applies to the following qualifications:
- Level 2 Certificate in Introduction to the Role of the Professional Taxi and Private Hire Driver
- Certificate Introduction to the Role of the Professional Taxi and Private Hire Driver SCQF level 5
- Health and Safety in a Construction Environment Award SCQF level 4
- PDA Scottish Football Association: Refereeing SCQF level 7
- Street Works
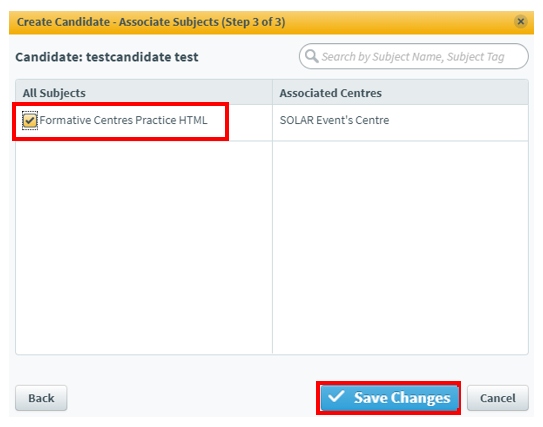
Create a single candidate
This section provides guidance on how to:
- Create a single candidate on SOLAR.
Follow this process to create a single candidate in SOLAR.
-
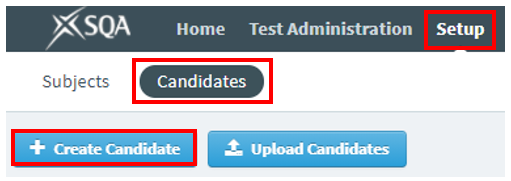
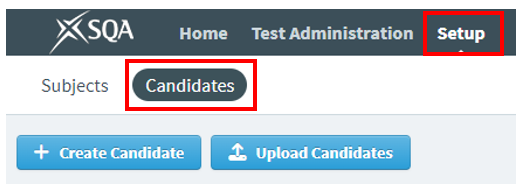
Select Setup, then Candidates, and finally Create Candidate.
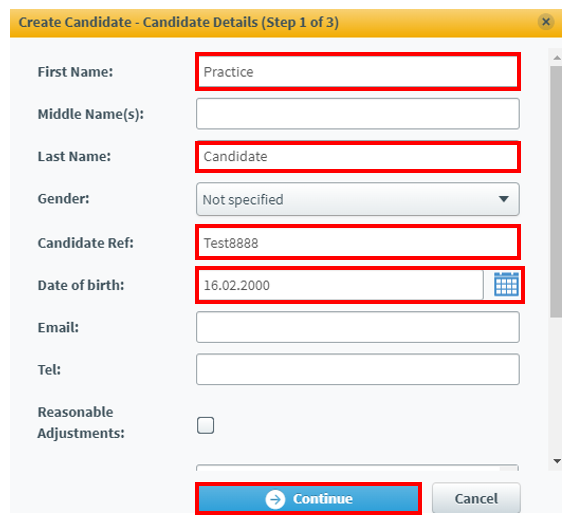
- In the Create Candidate – Candidate Details dialogue box, enter the candidate details in the text fields. You must only complete the mandatory fields listed below:
First Name: Enter the candidate first name.Last Name: Enter the candidate surname.
Candidate Ref: Enter the candidate SCN (Scottish Candidate Number - this is a nine-digit number and must include leading zeros if applicable). Candidates must be created with a valid SCN. Once created, this field cannot be edited. Failure to enter any data in this field will result in SOLAR automatically assigning a reference number beginning with ‘auto’. Candidates with auto-generated Candidate Refs will be retired, and a new candidate with a valid SCN must be created.
Date of Birth: Use the calendar icon to select the candidate date of birth.
-
Select Continue.
-
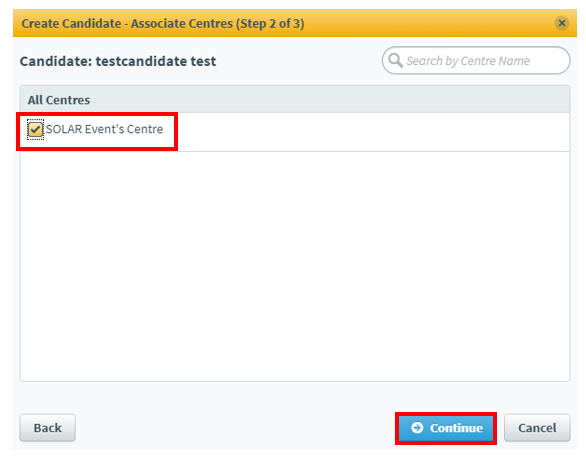
In the Create Candidate – Associate Centres dialogue box, select your centre to attach the candidate.
-
Select Continue.
-
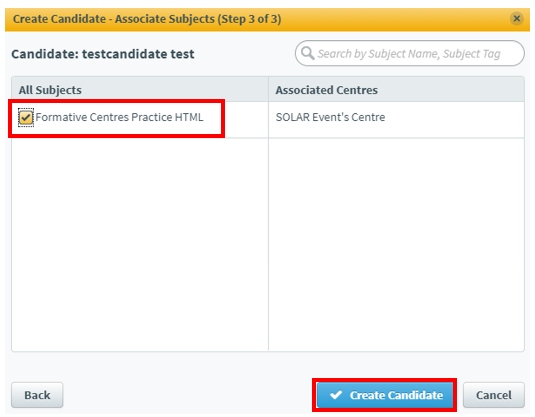
Select the checkbox next to the subject(s) you want to attach to the candidate(s). If your centre has many subjects to choose from you can use the search bar to find them.
-
Select Create Candidate.
If the candidate record is created successfully, a green confirmation message stating New Candidate successfully created will appear in the bottom right-hand corner of your screen.
Create multiple candidates in bulk
This section provides guidance on how to:
- Create multiple candidates
- Amend SOLAR records
- Use the Digital Assessment Services Support form to request a candidate transfer, if required.
Follow this process to import up to 1,500 candidates into SOLAR at the one time. During this process, any details for candidates which already exist in SOLAR will be overwritten. Before proceeding, you must check if candidates already exist in SOLAR by following the Find a Candidate Record process.
-
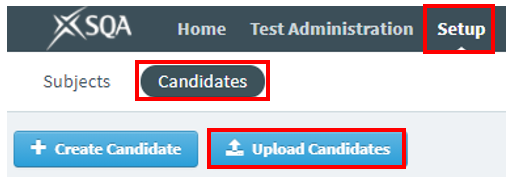
Select Setup, then Candidates, and finally Upload Candidates.
-
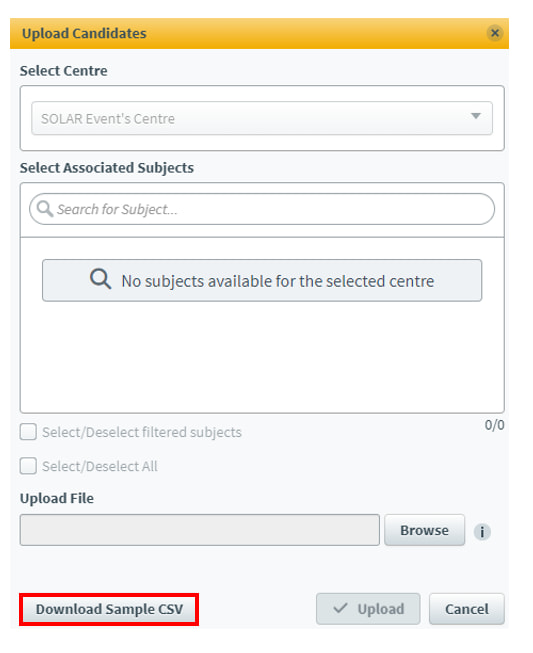
In the Upload Candidates dialogue box, select Download Sample CSV.
-
Once the CSV file has downloaded, open it if doesn't open automatically. We recommend using spreadsheet software, such as Microsoft Excel to open the CSV file. Important: do not save local copies of the template. You must always download the sample CSV file each time you complete this process.
-
Use the information in the following list to populate the CSV file. Please note: the CSV file has been pre-formatted as required. You must not alter the column headers, as any modification to the format will result in upload failure to SOLAR.
Candidate Ref: Enter the candidate SCN (this is a nine-digit number and must include leading zeros if applicable).
- Microsoft Excel will automatically remove any leading zeros from SCN numbers. To prevent this, set the formatting for this column to Text. To do this, highlight all cells in the SCN column (excluding the heading), right-click and select Format Cells from the menu, choose Text from the category box and select OK.
- Candidates must be created with a valid SCN in the Candidate Ref field. Once created, this field cannot be edited. If this field is left blank, SOLAR will automatically assign a reference number beginning with ‘auto’. Any candidates with an auto-generated Candidate Ref will be retired, and a new candidate with a valid SCN must be created.
- If a candidate with the same SCN already exists in SOLAR, their record (including Forename, Surname, and Date of Birth) will be overwritten during the upload.
Forename: Enter candidate first name.
Surname: Enter candidate surname.
Date of Birth: Enter the candidate date of birth.
-
Save the document to your computer. If you are using Microsoft Excel, select File, then Save As, and save the file on your computer. Give the file a recognisable name, such as ‘Monday Computing Class’.
-
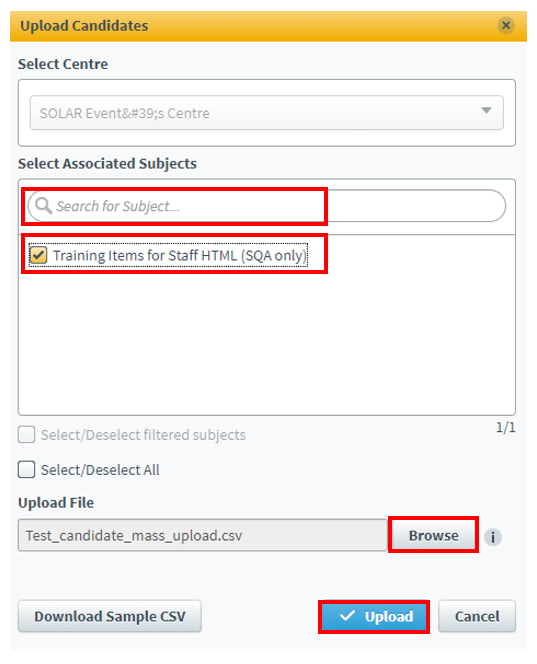
Return to SOLAR and the Upload Candidates dialogue box. Your centre should be selected by default unless you have access to more than one centre.
-
Select the subject you want to attach to candidates by checking the checkbox beside the name of the subject. (You can select multiple subjects by selecting multiple checkboxes if required).
-
Select Browse in the Upload Candidates dialogue box, select the file you just saved and select Open.
-
Select Upload.
Once complete, a notification will appear in the bottom right-hand corner of the screen, indicating the status of the uploaded candidates. It will provide specific details about any missing or incorrect information for unsuccessful candidates. If incorrect information has been entered, you will need to re-edit the file for the unsuccessful candidates only and upload it again.
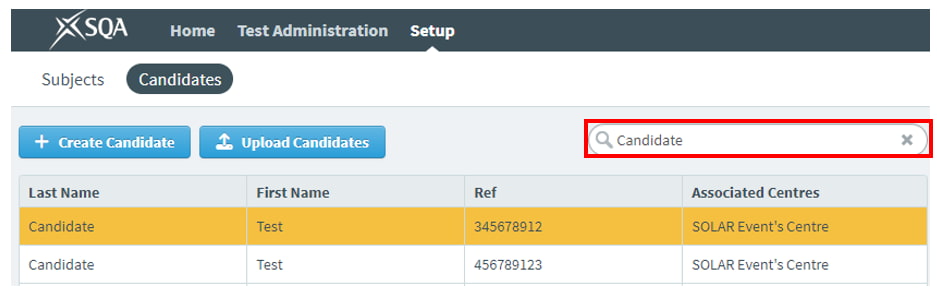
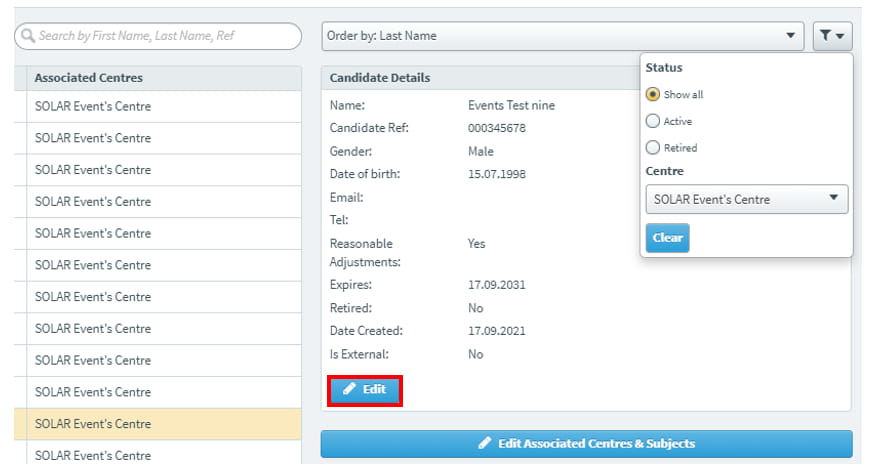
Find a candidate record
Follow this process to find a candidate in SOLAR. Candidate records can be active or retired and include an expiry date.
-
Select Setup, then Candidates.
-
Select the filter icon at the top right-hand side of the screen.
-
Select Show all from the Status section to view all candidates linked to your centre. (By default, only live candidates are displayed.) Depending on the number of candidates, there may be multiple pages. You can use the search option to find a specific candidate.
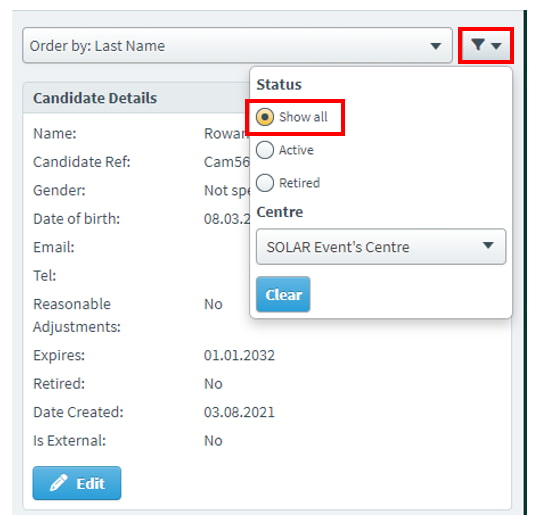
-
Enter the candidate’s name or SCN (Scottish Candidate Number - this is a nine-digit number and must include leading zeros if applicable) in the search bar. Try both options in case the name or SCN has been entered incorrectly.
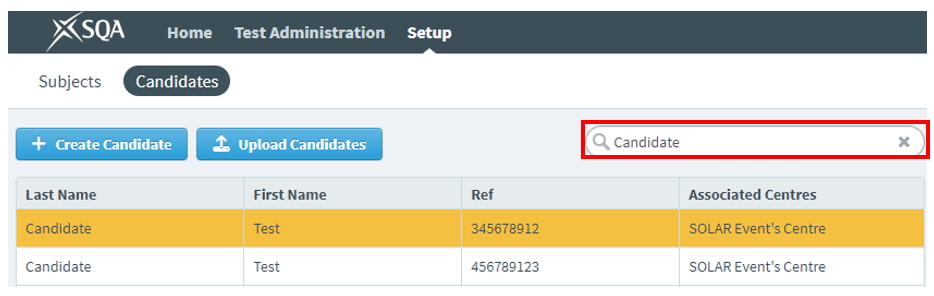
- If the candidate is not listed, it means they do not exist at your centre.
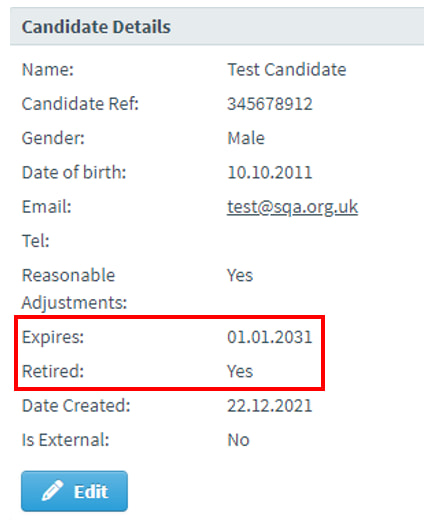
- If the candidate is listed, it means they already exist at your centre. Check the Candidate Details section for the Expires date and their Retired status.
- If the candidate record has not expired and is not retired, this means the candidate is active and can be scheduled for a test.
- If the candidate record has expired or is retired, you can reactivate them by following the Edit a candidate record process.
- If the candidate is listed more than once, it means additional candidate records have been created in error. Identify which record has the correct SCN and follow the Edit a candidate record process to retire any incorrect candidate records.
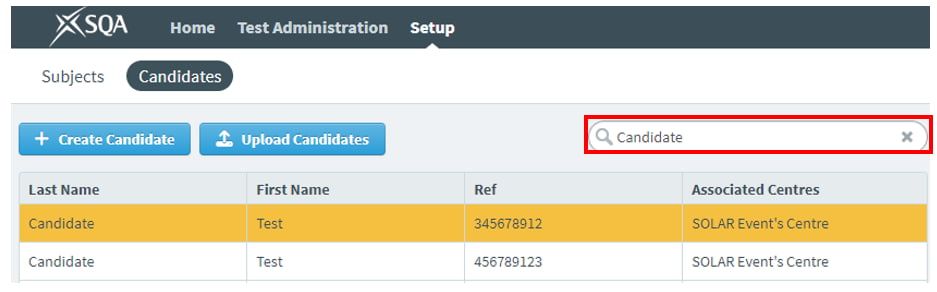
Edit a candidate record
This section provides guidance on how to:
- Amend candidate records
- Retire a candidate record.
Follow this process to edit candidates, including changing the expiry date and retiring or un-retiring candidates.
Please note: if a candidate's SCN has been entered incorrectly, it cannot be amended. If tests have not yet been scheduled for the candidate, the candidate record can be deletetd and a new one created. However, if the candidate has completed tests, the record must remain in order to view the test restults. A new candidate record should then be created for any future tests.
-
Select Setup, then Candidates.

-
Enter the candidate’s name or SCN (Scottish Candidate Number - this is a nine-digit number and must include leading zeros if applicable) in the search bar. Try both options in case the name or SCN has been entered incorrectly. Select the row to select the candidate you want to edit.
-
Select Edit to amend the candidate.
-
The Edit Candidate Details dialogue box will appear, allowing the following fields to be edited:
First Name and Last Name: to amend these fields, manually enter the name.
Gender: select the gender from the drop-down list.
Date of birth: to amend the date of birth, use the calendar icon or manually enter a new date.
Expires: to amend the expiry date, use the calendar icon or manually enter a new date.
Retired: to retire or un-retire a candidate, select the Retired checkbox.

-
Select Save Changes.
Once complete, a notification will appear in the bottom right-hand corner of the screen, confirming that the candidate details have been updated.
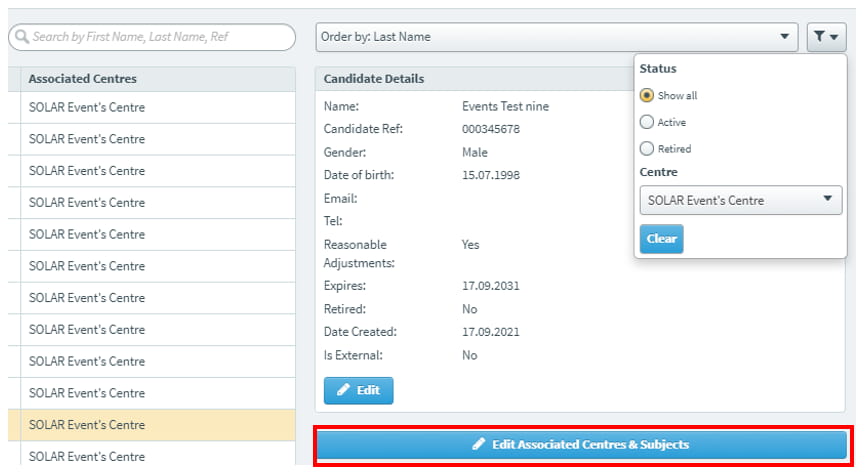
Add or remove subjects for a candidate
Follow this process to add or remove a subject for a candidate.
-
Select Setup, then Candidates.

-
Enter the candidate’s name or SCN (Scottish Candidate Number - this is a nine-digit number and must include leading zeros if applicable) in the search bar. Try both options in case the name or SCN has been entered incorrectly. Select the row of the candidate you want to add or remove subjects for.
-
Select Edit Associated Centres & Subjects.
-
Your centre will now be displayed in the Associated Centres dialogue box. Select Continue.

-
The subjects available for your centre to deliver will now be displayed in the Associate Subjects dialogue box.
-
To add a subject to the candidate, select the checkbox next to the subject(s).
-
To remove a subject from the candidate, deselect the subject by selecting the checkbox to remove the tick.
-
-
Select Save Changes.
Once complete, a notification will appear in the bottom right-hand corner of the screen, confirming that the candidate details have been updated.
How to Assess - Using Functionality
Learn how to schedule, edit and void both live and practice tests in SOLAR.
Schedule a test for individual candidates
This section provides guidance on how to:
- Schedule a test for an individual candidate.
Please note:
- Candidates cannot be scheduled for more than one test at the same time.
- Keycodes can only be used once. If a candidate requires re-assessment after completing a test, a new test must be scheduled.
Follow this process to schedule a test for an individual candidate.
-
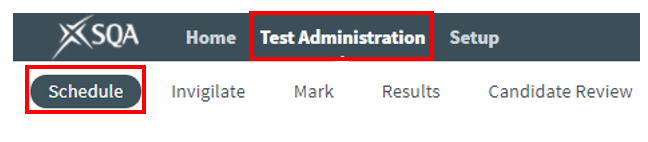
Select Test Administration, then Schedule.
-
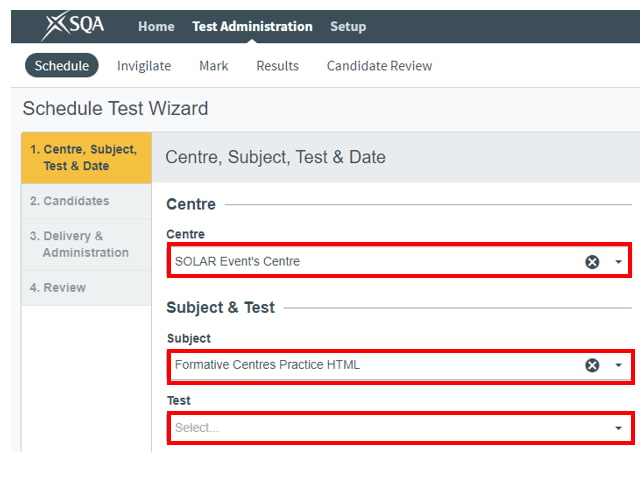
Select Schedule Test at the bottom of the screen to open the Schedule Test Wizard dialogue box.

-
Select your centre from the Centre drop-down menu.
-
Select the subject you want to schedule a test for, either by using the drop-down menu or by entering the subject name into the text field.
-
Select the test you want to schedule, either by using the drop-down menu or by entering the test name into the text field.
-
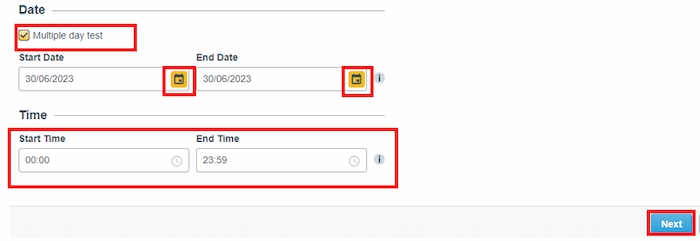
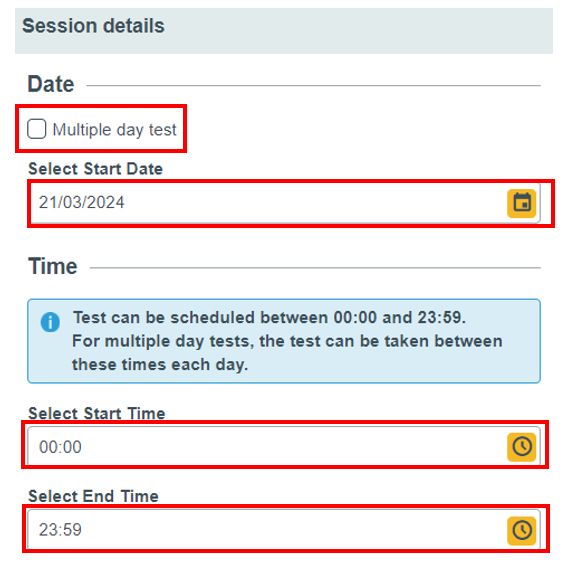
Select the calendar icons to set the start and end dates for the test. You can schedule it for a single day or choose the multiple day test option to set a date range of up to 30 days. Regardless of the date range, the test has a set duration and should be completed in one sitting.
Please note:
- If you select a start date of more than five days from today, the test keycode will not be generated immediately; it will only be generated once the start date is within five days.
- If the start date is within five days of scheduling, the test will lock, and the keycode will be generated. Keycodes can be accessed from the Invigilate screen. Important: you will have only 30 seconds after scheduling to make any edits before the test locks.
- You have the option to modify the start and end time for the test. However, we recommend leaving it as the default (full day). Candidates will receive the allocated time for their test, regardless of when the test begins. They can only start the test when you provide them with the keycode to access it.
Please note:If you have selected multiple day test and modify the start and end times, the test will only be available during those times on each individual day. For example, an assessment scheduled from 13:00 to 17:00 over 2 days will only be available from 13:00 to 17:00 on day 1, and 13:00 to 17:00 on day 2.
-
Select Next.
- If the test is a project to be completed over time, you will only have the option to set the start date and the submission date. Select the calendar icons to specify these dates.

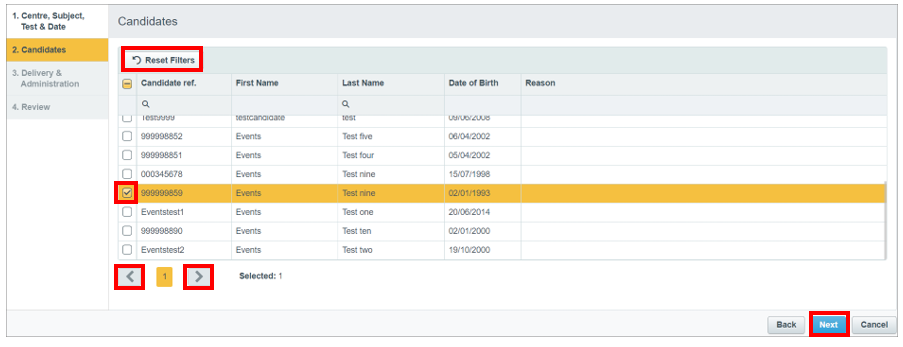
- Select the candidate(s) for this test by using the checkboxes in the first column. To select multiple candidates, hold the Shift key while selecting each candidate. You can also select all candidates by using the checkbox in the column header. Please note: 'select all' only applies to the current page. If there is more than one page of candidates, use the arrow buttons at the bottom of the screen to navigate to the next page and select the required candidates.
- Once you have selected your candidates, select Next.
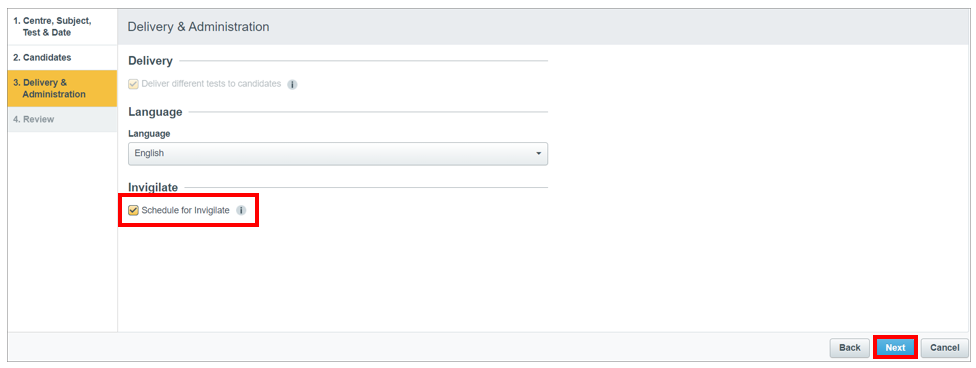
- You can choose an additional security option called Invigilation. If required, select the Schedule for Invigilate checkbox. This will lock the test and an invigilator must manually unlock it in the Invigilate screen.
- Select Next.
- The Review page provides a summary of the scheduled test, including the candidates assigned to it and the scheduled date(s) and time. Candidates with additional support needs can be allocated extra time. You must read the Assessment Arrangements section of the SOLAR Centre Operating Guide before providing candidates with additional time. To allocate additional time for a candidate, select the test and then select Modify Duration.
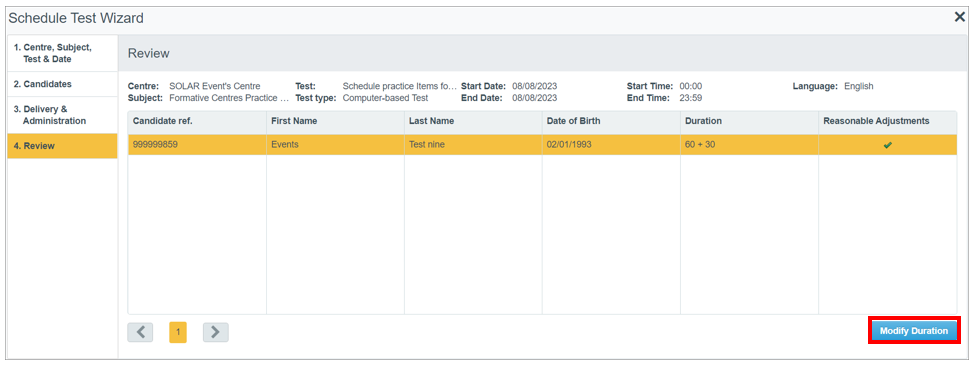
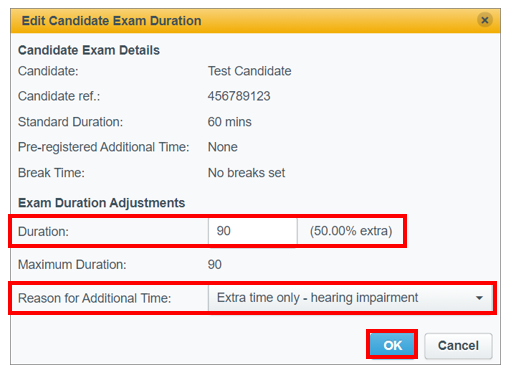
- In the Edit Candidate Exam Duration window, adjust the duration as required. You cannot exceed the maximum duration specified. Choose a reason for additional time from the drop-down menu, and then select OK.
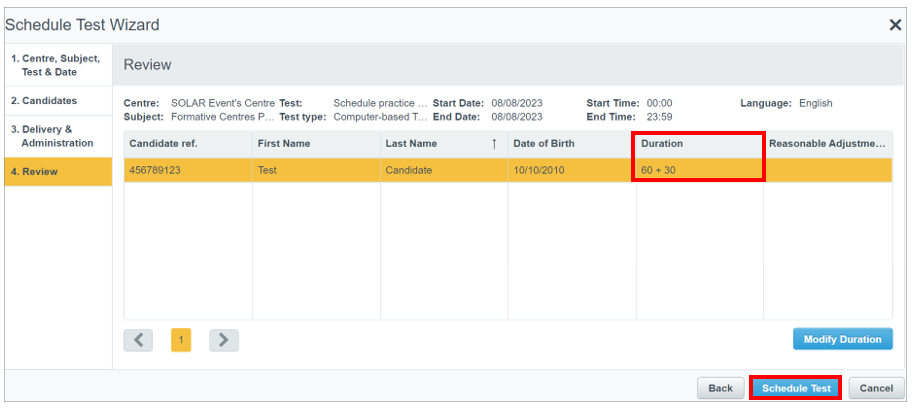
- The Duration column on the Review page will now display the additional time requested. If all the details are correct, select Schedule Test.
- Once the assessment is scheduled, go to the Invigilate a test section for guidance on providing keycodes to candidates and managing the live assessment.
Schedule a test for multiple candidates
This section provides guidance on how to:
- Schedule a test for multiple candidates.
Follow this process to schedule tests for more than one candidate. Bulk Scheduling provides a simpler way to manage and assign test times to a high volume of candidates.
-
Select Test Administration, then Schedule.

-
Select Bulk Schedule at the top of the screen.
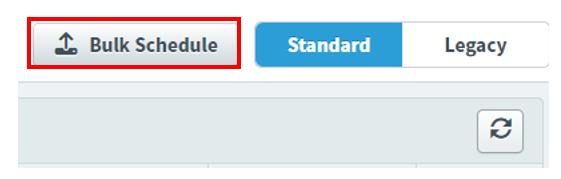
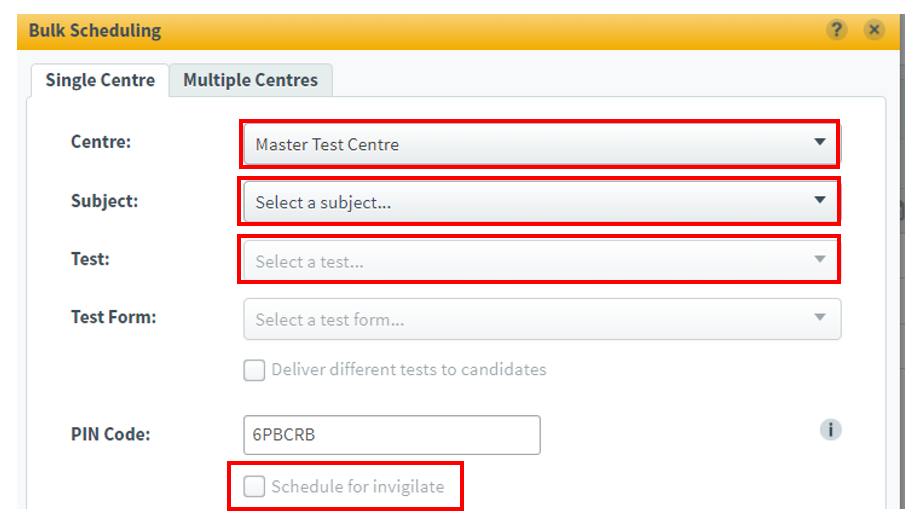
In the Bulk Schedule dialogue box, under the Single Centre tab, complete the following.
-
Select your centre from the Centre drop-down menu.
-
Select the Subject and Test from the drop-down menus. (The filter includes all the subjects and tests attached to your centre).
-
If required, select the Schedule for invigilate checkbox. This locks the test, and an invigilator must manually unlock it in the Invigilate screen.
-
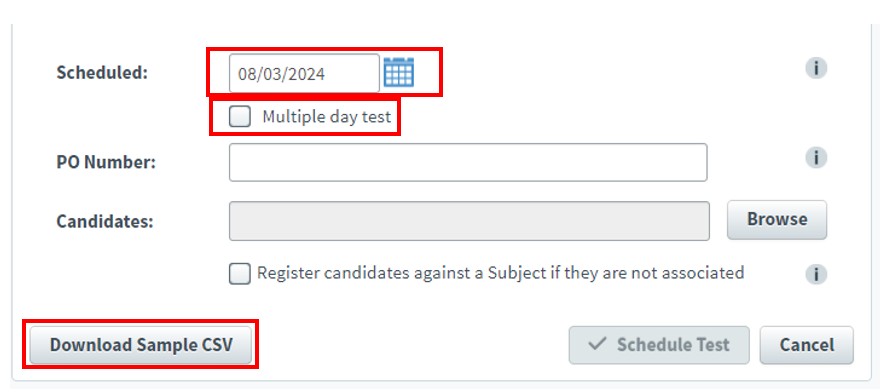
Select the calendar icon to set the start and end date for the test. You can schedule it for a single day or select the multiple day test option to set a date range of up to 30 days. Regardless of the date range, the test has a set duration and should be completed in one sitting.
Please note:
-
If you select a start date more than five days from today, the test keycode will not be generated immediately. It will only be generated once the start date is within five days.
-
If the start date is within five days of scheduling, the test will lock, and the keycode will be generated. Keycodes can be accessed from the Invigilate screen. Important: you will have only 30 seconds after scheduling to make any edits before the test locks.
-
-
Leave the PO Number field blank.
-
Select Download Sample CSV.
-
Once the CSV file has downloaded, open it if it hasn’t opened automatically. We recommend using spreadsheet software, such as Microsoft Excel, to view the CSV file.
-
Do not save local copies of the template. You must download the sample CSV file each time you complete this process.
-
-
Populate the CSV file with the SCNs of the candidates you wish to schedule the test for.
-
The CSV file is pre-formatted to meet the upload requirements. Do not modify the column headers, as altering the format will result in upload failure to SOLAR.
-
Microsoft Excel will automatically amend any SCN numbers with leading zeros by removing the zeros. To prevent this, set the SCN column formatting to Text. To do this, highlight all cells in the SCN column (excluding the heading), right-click, select Format Cells, choose Text from the category box, and select OK.
-
-
Save this document to your computer.
-
If using Microsoft Excel, select File, then Save As, and save the file to your computer with a recognisable name, such as ‘Monday computing class’. Please note: once you have saved the document, do not reopen it before uploading to the Surpass system, as Excel will alter these cells, causing you to lose your edits.
-
-
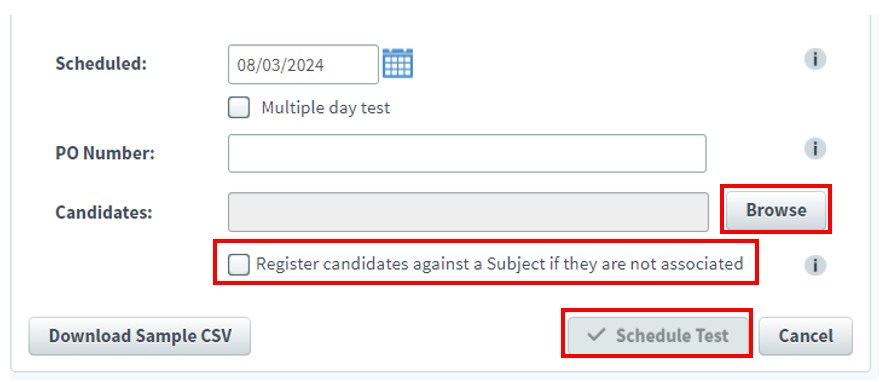
Return to SOLAR. In the Bulk Scheduling dialogue box, select Browse, choose the file you just saved and select Open.
-
Select the Register candidates against a Subject if they are not associated checkbox if required. This will automatically associate candidates with the Subject if they are not already linked.
-
Select Schedule Test.
-
The Bulk Scheduling dialogue box will indicate that bulk scheduling is in progress and will confirm when it has been completed, noting whether it was successful. If bulk scheduling was unsuccessful, select View Report for details. You will also receive an email from noreply@surpass.com confirming this information.

-
Once the assessment is scheduled, refer to the Invigilate a Test section for instructions on providing keycodes to candidates and managing a live assessment.
Practice tests
This section provides guidance on how to:
- Access practice tests.
Practice tests are available for centres and/or candidates to familiarise themselves with using SOLAR. Live summative tests must not be used for practice or testing purposes.
-
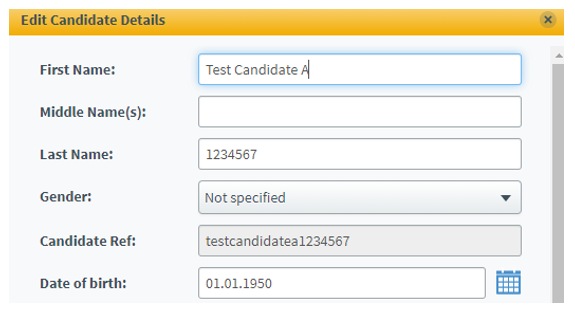
If a centre user wishes to take a practice test, they must use one of the three test candidates created specifically for this purpose. These test candidates follow naming convention below:
-
First Name: Test Candidate X (where X is either A, B, or C)
-
Last Name: Centre Number
-
Candidate Ref: testcandidatexcentrenumber (where x is either a, b or c)
-
Date of birth: 01.01.1950
-
-
If a candidate wishes to take a practice test you must add them to the Subject Formative Practice HTML by following the Add subjects to or remove subjects from a candidate process.
-
Two practice tests are available for scheduling:
-
Formative Test Practice – Computer Marked: This test includes a variety of generic questions that are automatically marked.
-
Formative Test Practice – Human Marked: This test includes a variety of generic questions that require human marking.
-
-
To schedule practice tests as required, follow the instructions to Schedule a test for individual candidates.
Edit a test
This section provides guidance on how to:
- Edit a test date and time.
- Add or remove candidates from a test.
Follow this process to edit a test that has already been scheduled. Edits can be made up to five days before the test’s start date. You can adjust the test date(s) and add or remove candidates from the scheduled test.
-
Select Test Administration, then Schedule.

-
You will now see the assessments you have scheduled. Choose the one you want to edit, then select Edit Test.

-
The candidate, centre name, or subject cannot be changed; only the date and time can be edited. Select the calendar or clock icons to change the date, start time, or end time of the test. Select the checkbox next to Multiple day test to amend the test duration, choosing between a single day or multiple days.
-
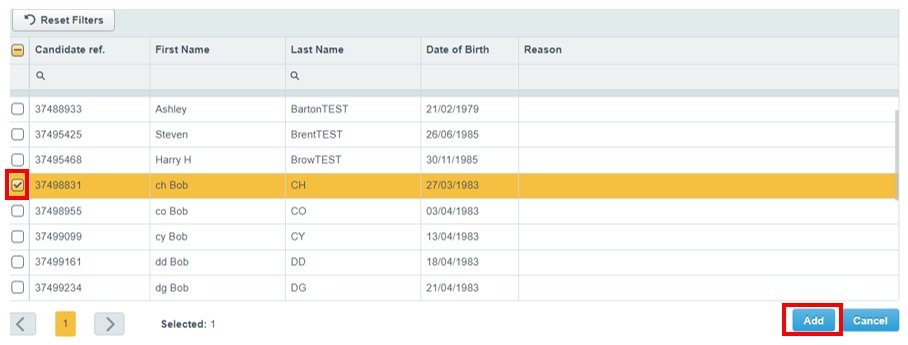
Select Add Candidates to add new candidates to the test. A list of available candidates will be shown. Select the checkbox(es) next to the candidate(s) you want to add, then select Add.
-
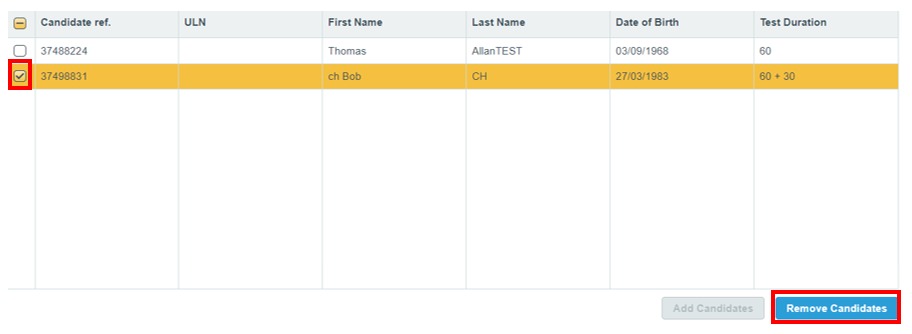
Select the checkbox(es) next to any candidate(s) you want to remove, then select Remove Candidates. Select OK to confirm.
-
Select Save Changes.

Delete a test
This section provides guidance on how to:
- Delete a scheduled test.
Follow this process to delete a test that has already been scheduled. Tests can be deleted up to five days before their start date. Tests cn be deleted up to five days before their start date. In such cases, follow the Invigilate a Test process to void the locked test.
-
Select Test Administration, then Schedule.

-
Choose the test you want to delete and select Delete Test.
-
Select OK to confirm.

Invigilate a test
This section provides guidance on how to:
- Add additional security for a test.
When scheduling a test, you can add an extra level of security by enabling invigilation. This will lock the test for a candidate once they enter the test keycode. The lock must be released by the centre on the delivery date in the Test Administration section.
-
Select Test Administration, then Invigilate.
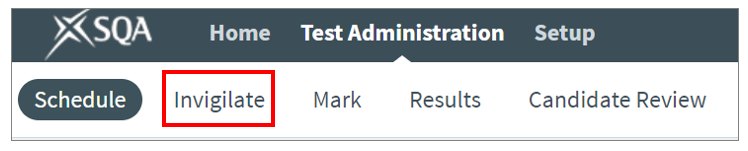
-
Scheduled tests only appear in the Invigilate screen five days before the start date of the test. At this point, the test is locked and a keycode is generated. Keycodes are unique to each candidate and test.
-
The State column displays the status of each test using a symbol. Hover over the symbol to view the status description. The symbols are as follows:
 Ready: the test is ready to be taken.
 Locked for Invigilator: the candidate has entered their keycode and is awaiting the invigilator to unlock the test.
 In Progress: the candidate is currently taking a test.
 Paused: the test has been paused.
 User disconnected: the candidate has been disconnected from the test.
 Finished: the candidate has completed their test successfully.
 Voided: the test has been voided.
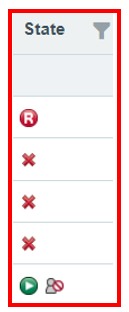
-
Choose the test you want to invigilate by selecting the checkbox next to its name. To choose multiple tests, select the checkboxes for the relevant assessments.
-
The invigilation options available on the Invigilate screen are as follows:
-
Unlock: this unlocks a test after a candidate has entered their keycode, allowing them to start the test.
-
Pause: this pauses a test. This must only be used in cases of adverse impacts to the assessment, such as a physical disruption (for example, a fire alarm) or when a candidate has an agreed assessment arrangement (for example, rest periods).
-
Resume: this resumes a paused test.
-
Void: this cancels the test, meaning the candidate will no longer be able to sit the test. You must select a reason for voiding the test from the drop-down menu.
-
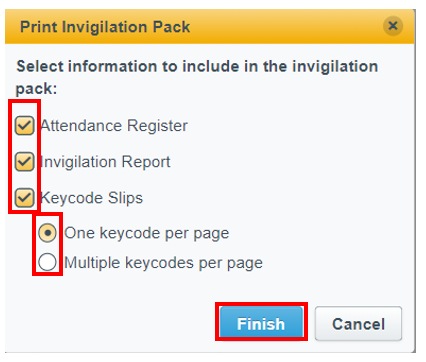
Print Invigilation Pack: this allows you to print or save an invigilation pack, which includes an attendance register, invigilation report, and keycode slips (either one keycode per page or multiple keycodes per page).

-
-
Select the checkboxes or radio buttons to add or remove information as required, then select Finish.
-
You must provide the keycodes to the candidates to allow them to access their test.
-
Once the assessment is complete, refer to the Mark a Test section for instructions on how to mark the assessment if required, or the View Test Results section to learn how to view the assessment results.
Mark and View Test Results
This section explains how to mark a test (if required to do so), view the results and schedule a candidate review.
Mark a test (human marking)
This section provides guidance on how to:
- Assign and submit marks.
- Review marking instructions.
- Add comments to candidate responses.
Learn how to mark a test in SOLAR, where required.
SOLAR assessments may be:
- Fully automatically marked
- Partially automatically marked and partially human-marked
- Fully human-marked
To find out whether a test requires human marking, refer to the List of Available Assessments.
Any assessment that is partially or fully human-marked must be marked by the centre in a timely manner. We recommend that all assessments are marked, internally verified, and released within 60 days of completion. Centres should implement regular checks on SOLAR to ensure that any outstanding scripts are marked and verified promptly.
Please note that SOLAR will automatically void any human-marked assessments not submitted within 180 days. After this period, the assessment can no longer be accessed or marked, and candidates will not receive a result.
-
Select Test Administration, then Mark.

-
If required, you can sort or filter the tests to find the test you want to mark. Select a column heading to sort by that column. Select the arrow on the left-hand side of the screen to access the filters.
-
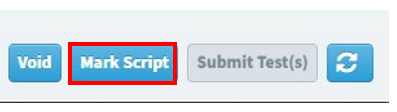
Select the test you want to mark - the line will highlight once selected.
-
Select Mark Script at the bottom of the screen to start marking.
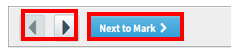
-
Use the arrow icons to navigate through questions. A test may have a mixture of automatically marked and human marked questions. Where this is the case, select Next to Mark to move to the next question that requires human marking.
-
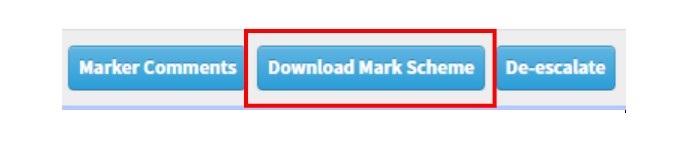
Access the marking instructions by selecting Download Mark Scheme at the bottom of the screen.

-
To add comments to the candidates’ responses, select Marker Comments at the bottom of the screen.

-
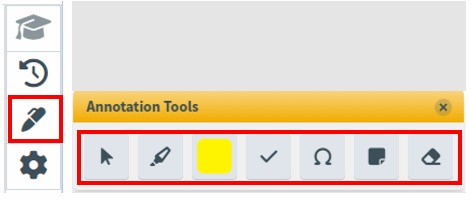
To add annotations to a candidate’s response, select the annotations icon on the right-hand side of the screen. Choose an annotation from the annotation toolbar, then select where on the candidate’s response you want to place the annotation. A highlighter tool, tick, comments box, eraser and other symbols are available.
-
If the notepad tool has been provided to candidates in a question, for example, to provide working, select the notepad icon in the candidate’s response to access it. Note that annotations cannot be added to the notepad.
-
To mark a question, select the Mark box and enter the mark you intend to award, up to the maximum allowed. As you continue marking, the progress indicator will adjust accordingly, reaching 100% once all questions have been marked.

-
Select Assign Mark once you have completed marking the question.

-
Select X (the cross) to save and close the script.
-
When all marking is complete, select Submit Script at the bottom of the screen to submit the script. Once a script has been submitted, you will not be able to make any changes to the marks awarded.

-
Once the assessment is marked, it will automatically move into the Moderate tab, where internal verifiers can access, review, and release it. refer to View Test Results in the Results, reporting and candidate breakdown section to find out how to see the results of the assessment.
Internal verification of a test (human marking)
- Internally verify a test
- Review marking instructions
- Adjust marks
- Escalate for further review
Learn how to internally verify a test in SOLAR, where required.
SOLAR assessments that require internal verification may be:
- Partially or fully human-marked
To find out whether a test requires human marking, refer to the List of Available Assessments.
Any assessment that is partially or fully human-marked must be marked by the centre. Once marked and submitted, it will automatically move into the Moderate tab to allow centres to carry out internal verification.
Select Test Administration, then Moderate.
.jpg)
The Moderate screen automatically displays all marked and submitted scripts for your centre. To find the test you want to verify, sort or filter the column as required. Select a column heading to sort the data alphabetically or numerically.

Select the test you want to internally verify - the line will highlight once selected - then choose View Responses.

Select Download Mark Scheme to view the marking instructions.
Select the Marking History icon on the right-hand side of the screen to view the date, name, mark, and markers comments from previous marking.

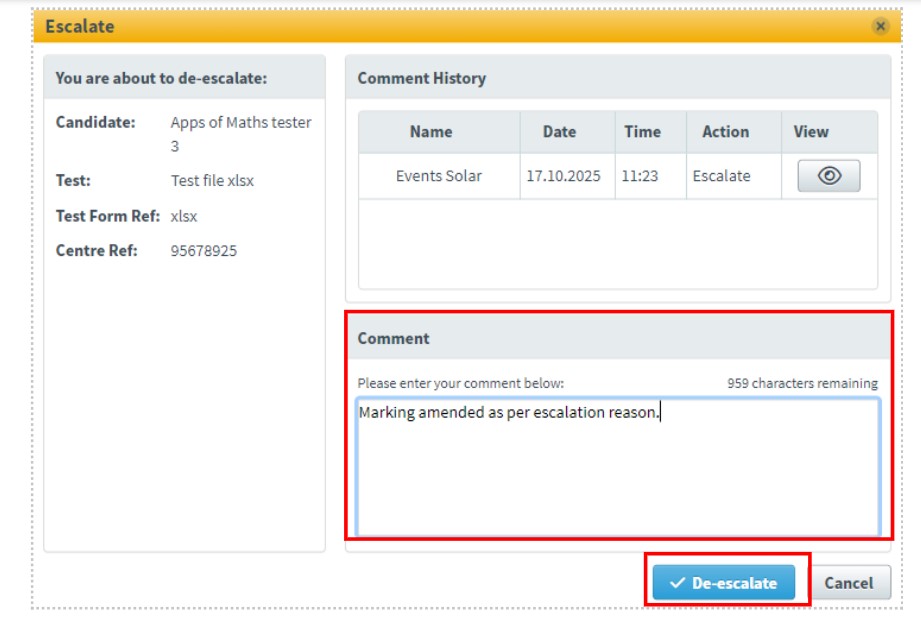
Escalating a script
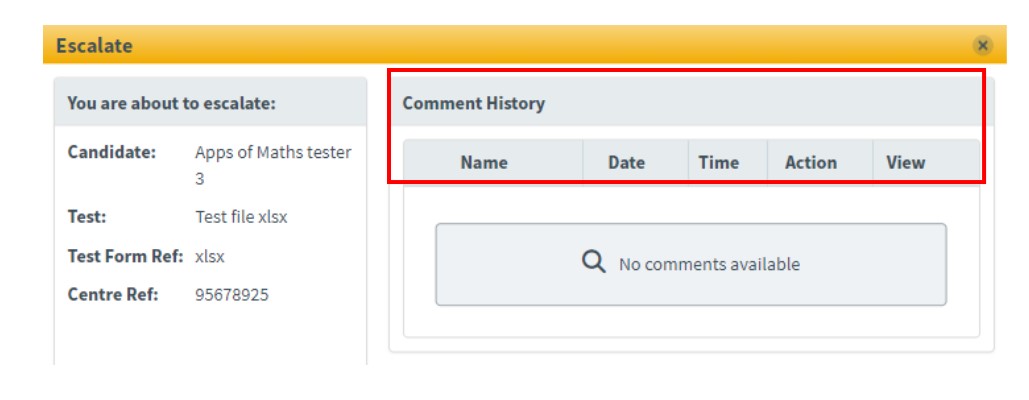
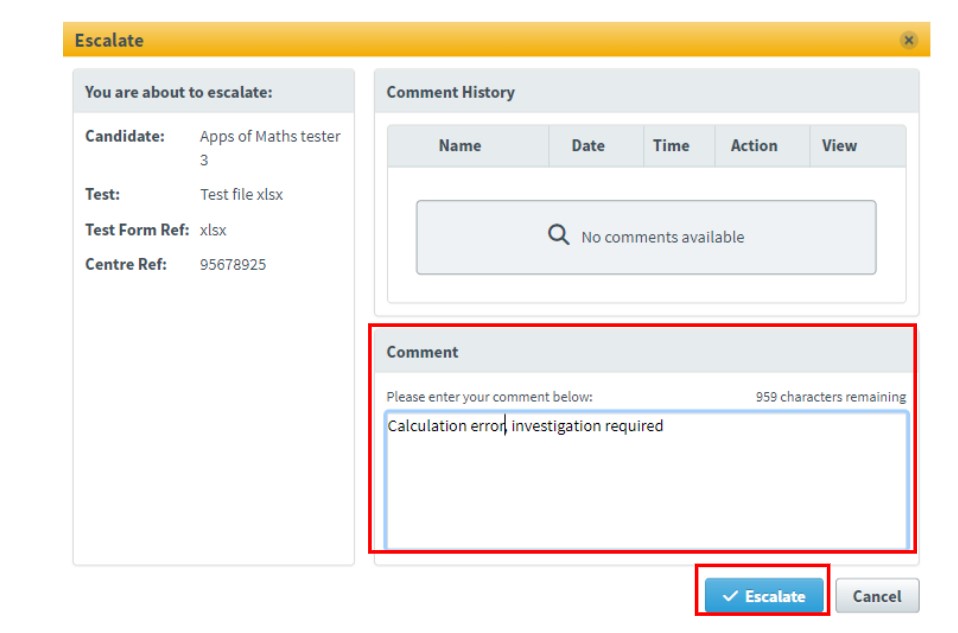
To escalate scripts that require further attention or investigation, select Escalate at the bottom of the screen.

In the Escalation dialogue box, the Comment History section displays the escalation history for the script. This section lists all current and past escalation details.
Explanation of headings:
Name: Displays the name of the user who escalated or de-escalated the script.
Date: Displays the date on which the script was last escalated or de-escalated.
Time: Displays the time the script was last escalated or de-escalated.
Action: Displays the escalation action taken (Escalate or De-escalate).
View: Displays the comment left by the user.
Before you can escalate a script, you must enter a reason in the Comment box, then select Escalate.
Amending the mark
If required, you can amend the test mark when escalating the script. To do this, change the mark in the Mark box and select Assign Mark. Marker comments should be added when making any changes.

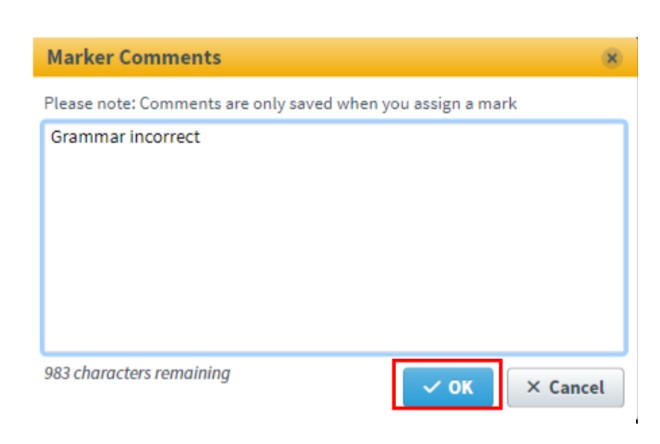
To add a marker comment, select Marker Comments at the bottom of the screen.

Enter your comments and select OK.
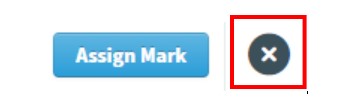
To exit the assessment and return to the list of assessments in the Moderate screen, select the circle with a cross icon at the top right of the screen.
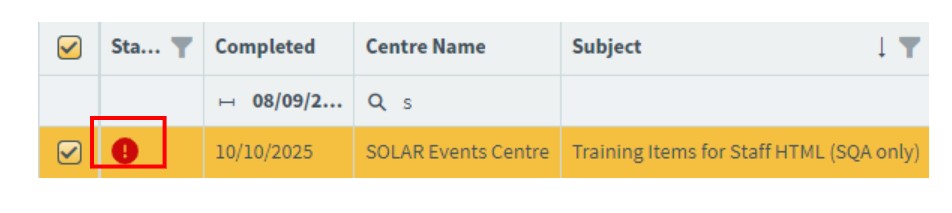
In the list of assessments in the Moderate screen, escalated scripts are marked with an exclamation mark in the Status column.
De-escalating a script
To de-escalate a script, select the test you want to de-escalate - the line will highlight once selected - then choose De-escalate.
When internal verification is complete, select Release at the bottom of the screen.

Once the assessment is released, it will automatically move into the Results tab. Results will be generated, and you will no longer be able to make any changes to the marks awarded.
Results, reporting and candidate breakdown
This section provides guidance on how to:
- View candidate results and reports.
View Test Results
This section explains how to view test results in SOLAR.
-
Select Test Administration, then Results.

The Results screen includes the following columns:
Completed: the date on which the candidate submitted their script
Centre Name: the name of the centre
Subject: the name of the subject
Test Name: the name of the test
First name: the candidate’s first name
Last name: the candidate’s last name
Candidate ref: the candidate’s SCN
Result: the result achieved by the candidate
Mark: the numerical mark achieved by the candidate
Percent: the percentage score achieved by the candidate.
Keycode: the keycode the candidate used to enter the test.
To filter the Completed column, select the calendar icon to choose specific dates.
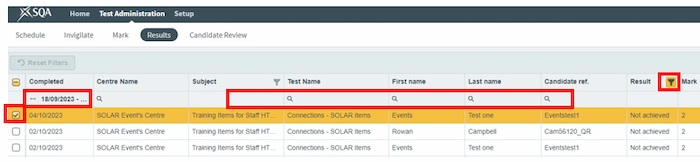
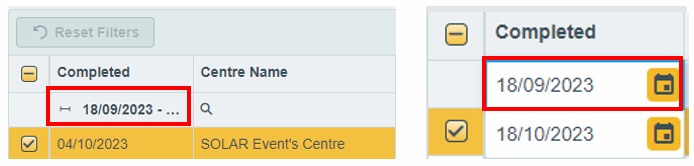
You can reset to the default view at any time by selecting Reset Filters.

-
Select a row to choose a test. Once a test is selected, you can access the report options located in the bottom-right hand side of your screen. You can select more than one row; however, some options are unavailable when multiple rows are selected.

-
When you select any of these options, a window opens over the Results screen. Select the cross in the top right-hand corner to close the window and return to the Results screen.
View Responses: displays the selected candidate’s script in read-only mode, showing their responses, the marks assigned, and any marker's comments. Only available when a single candidate is selected. This option is only available when a single candidate is selected.

Candidate Report: displays the selected candidate’s results, including a summary, breakdown, and a detailed report. This option is only available when a single candidate is selected.

Summary: displays an overview of the selected candidates, including test date and results. This option is available for both single and multiple candidates.

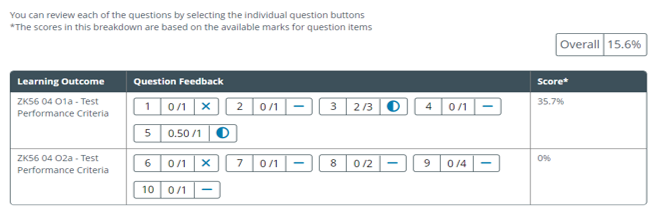
Candidate Breakdown: displays a breakdown of the number of correct answers per learning outcome for the selected candidates. This option is available for both single and multiple candidates. Selecting multiple candidates allows you to compare performance across different candidate cohorts, classes, or years.
Test Breakdown: displays the number of correctly answered questions in each test. This option is available for both single and multiple candidates are selected. You may wish to select multiple candidates to compare performance across different candidate cohorts, classes, or years.
Results Slip: shows whether the candidate has achieved or not achieved the test, along with details such as the subject name, the centre name and address where the test was administered, and the candidate’s results as a percentage. This option is available for both single and multiple candidates.
Schedule a candidate review
This section provides guidance on how to:
- Schedule a candidate review.
A candidate review may be used to go through a test with a candidate, to review their performance and identify areas where further learning may be required.
-
Select Test Administration, then Candidate Review.

The Candidate Review screen contains the following columns:
Date: the date on which the review session is scheduled to take place
Time: the time window during which the review session will take place
Passcode: the six-digit passcode required to access the candidate review session
Centre: the name of the centre at which the candidate review session will take place
Test: the name of the test that is being reviewed
No. of Candidates: the total number of candidates scheduled for the review session
Name: the candidate’s name
Candidate Ref: the candidate’s SCN (Scottish Candidate Number - this is a nine-digit number and must include leading zeros if applicable)
Keycode: the keycode the candidate used to enter the test
Completed Date: the date on which the candidate submitted their script
-
Select Schedule Review.

-
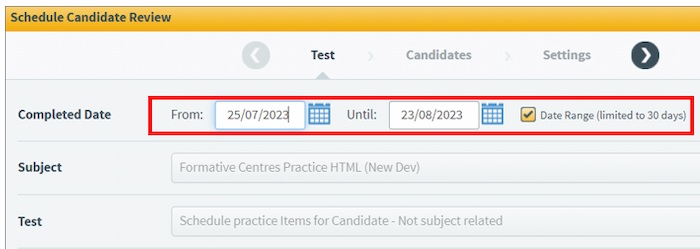
In the Schedule Candidate Review dialogue box, the default Completed Date range is the last 30 days. To adjust this range, use the calendar icons to select specific dates for when the test was completed, up to a maximum of 30 days. If you know the exact date, uncheck the Date Range checkbox and select a specific date.
-
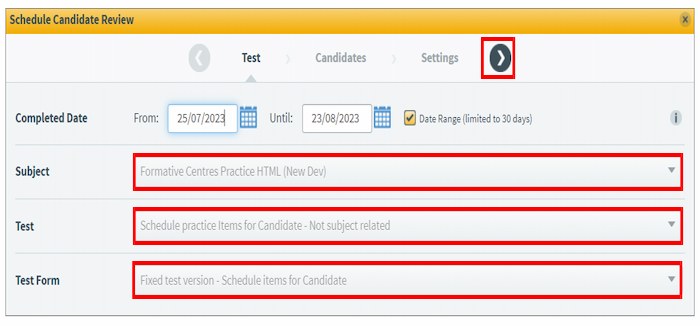
Using the dropdown menus, select the Subject, Test, and Test Form. The Test Form may be preselected. Then select the arrow at the top.
-
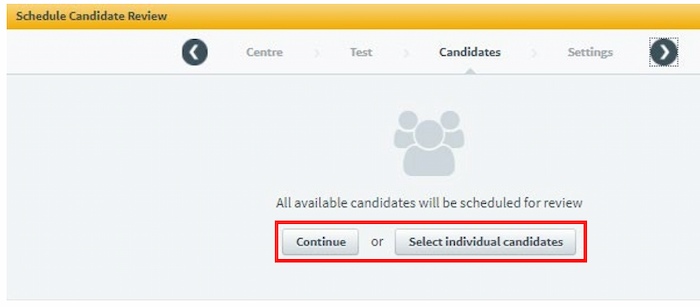
Select Continue to schedule all available candidates for the candidate review or choose Select individual candidates to specify which candidates you want to include.
-
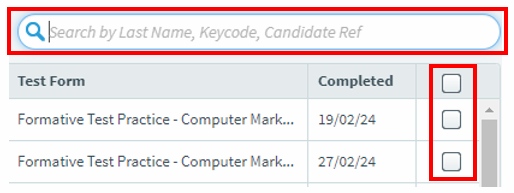
If you select individual candidates, use the checkboxes to select them. A search box is available if required.
-
Select the arrow to continue.

-
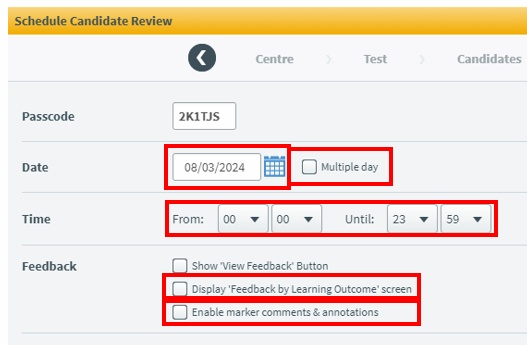
The system will automatically generate a six-digit passcode. Select the calendar icon to choose the date for the candidate review. To schedule the review over multiple days, select the Multiple day checkbox and select the start and end dates. To schedule a specific time, select the start and end times. If required, select the checkboxes for Display Feedback by Learning Outcome screen or Enable marker comments and annotations.
-
Select either Schedule Review or Schedule Review and Print Keycodes.
-
Schedule Review schedules the candidate review and adds it to the list on the Candidate Review page, displaying details such as the passcode and keycodes.
-
Schedule Review and Print Keycodes: schedules the candidate review and opens a new, printable window.

-
-
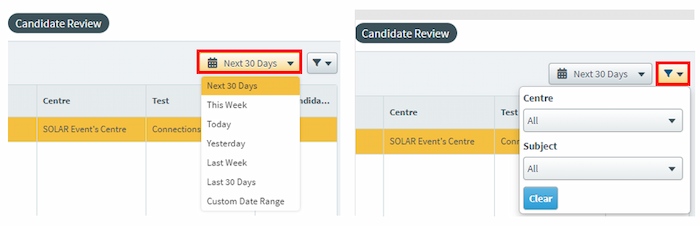
The Candidate Review screen displays all scheduled candidate reviews. A calendar filter is available to change the date range, and a subject filter is available to choose a specific subject.
-
Select a row to highlight a Candidate Review. The following actions are available in the menu at the top:
Print: opens a new, printable window with candidate review details
Edit: allows you to edit the candidates or settings for the candidate review
Review History: allows you to review a history of changes made to the candidate review
Delete: allows you to delete a candidate review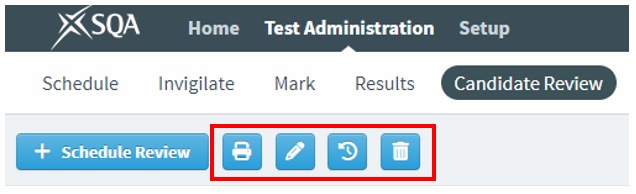
-
If you require a summary of a candidate script, you can select the Additional Candidate Information icon located at the top right-hand side of the screen.

Completing candidate review
This section provides guidance on how to:
- Access and complete a candidate review.
-
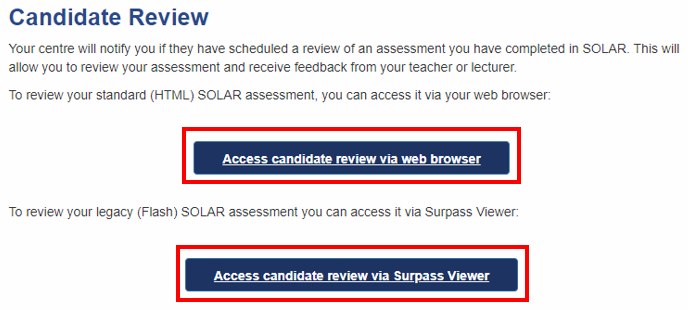
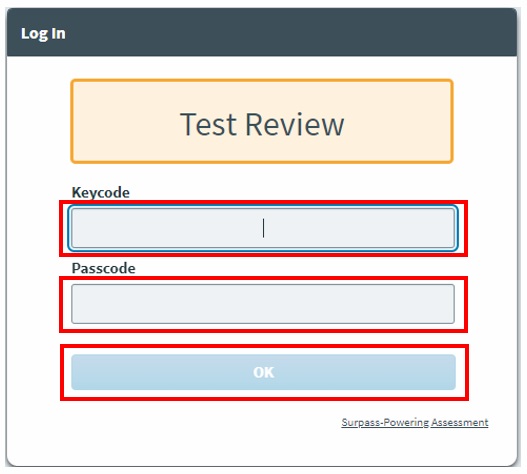
Go to the Candidates tab on the SOLAR website.
-
Choose Access candidate review via web browser if the test was completed in a web browser or Access candidate review via Surpass Viewer if the test was completed using Surpass Viewer.
-
Enter the keycode and passcode, then select OK.
-
You will see tabs for Test Result, Summary by Question, Summary by Unit, and Summary by Outcome. Select a tab to access that section.

Test Result displays the result and/or the percentage achieved in the test.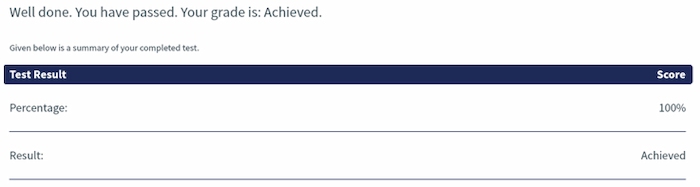
Summary by Question displays each question or task, with an icon indicating whether the response was correct, incorrect, partially correct or not attempted.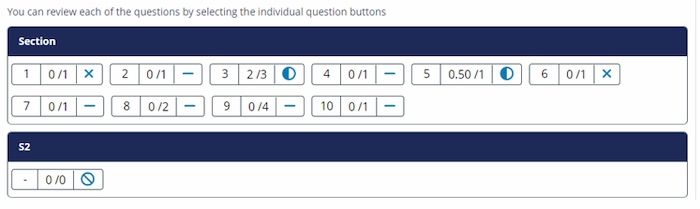
Summary by Unit displays each question or task grouped by unit, with an icon indicating whether the response was correct, incorrect, partially correct, or not attempted, and an overall score for that unit.
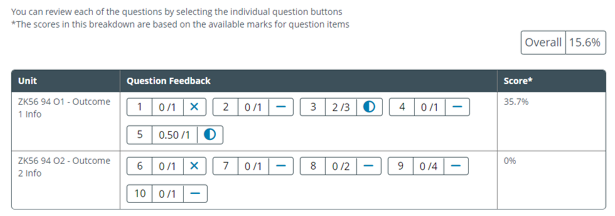
Summary by Outcome displays each question or task grouped by outcome, with an icon indicating whether the response was correct, incorrect, partially correct, or not attempted, and an overall score for that unit.
In either Summary by Question, Summary by Unit or Summary by Outcome, select a question or task to view the response and any comments made by markers on human-marked questions. -
Select the view comments icon to see marker comments.

-
Select Back or Next at the bottom of the screen to navigate to the previous or next question or task.

-
Select the back arrow icon to return to the Test Feedback screen.

-
Select Exit in the top right-hand corner of the screen when you have finished your candidate review.

Centre SOLAR User Accounts Creation and Editing
This guidance explains how to manage access to SOLAR for your centre. It is intended for the Centre SOLAR Co-ordinator, who is responsible for maintaining access to SOLAR for other staff members within your centre who require it.
You must follow all instructions in this section exactly as described. Failure to do so may result in issues for users accessing SOLAR.
For additional information about access to SOLAR and the associated data, please refer to the SOLAR Centre Operating Guide.
As Centre SOLAR Co-ordinator you can assign Centre SOLAR User roles to staff members within your centre. However, you cannot assign Centre SOLAR Co-ordinator roles. If you need to change your Centre SOLAR Co-ordinator, please contact our Digital Services Support Helpdesk.
Roles
In SOLAR, there are three centre roles available.
Centre SOLAR Co-ordinator – Setup
This role is for Centre SOLAR Co-ordinators and gives access to:
- Create and manage other SOLAR users in your centre
- Create and manage candidates in your centre
Centre SOLAR User – Setup
This role is for Centre SOLAR Users and gives access to:
- Create and manage candidates in your centre
Centre SOLAR User – Test Administration
This role is for both Centre SOLAR Co-ordinators and Centre SOLAR Users and gives access to:
- Schedule, invigilate, and mark assessments
- View results and schedule candidate reviews of assessments
Create a new user
-
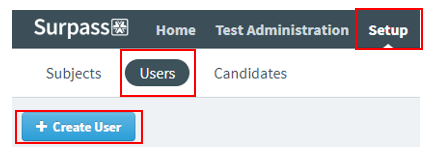
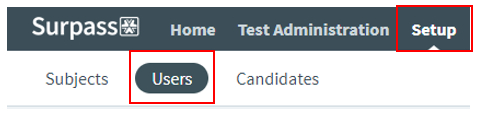
Select Setup, then Users, and finally Create User.
-
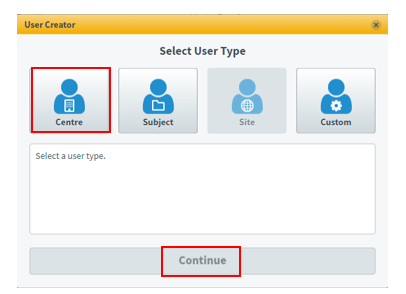
In the Select User Type dialogue box, choose Centre, then select Continue.
-
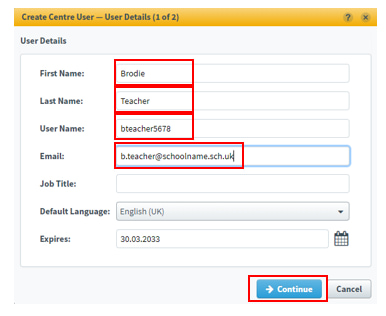
In the Create Centre User – User Details dialogue box, enter the user’s details in the text fields. You should only complete the fields listed below:
-
First Name: enter the user’s first name
-
Last Name: enter the user’s surname
-
User Name: use the format InitialSurnameCentreNumber, for example BTeacher2345678
-
Email: enter the user’s email address
-
-
Select Continue.
-
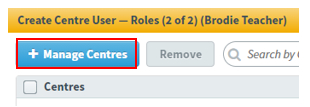
Select Manage Centres.
-
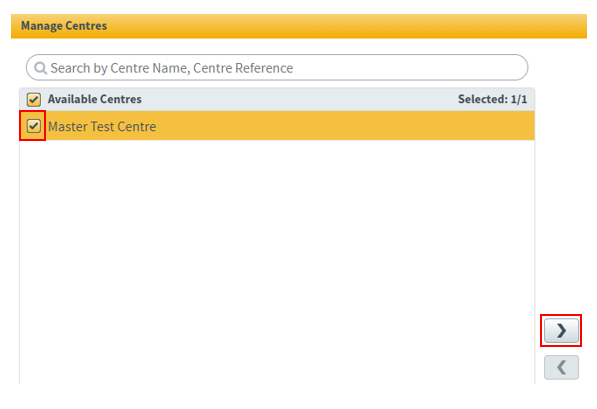
In the Manage Centres dialogue box, your centre should be listed under Available Centres. Select the checkbox next to your centre and select the right-facing arrow.
-
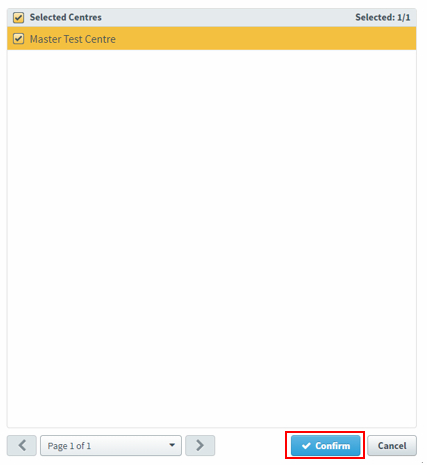
Your centre should now be listed under Selected Centres. Select Confirm.
-
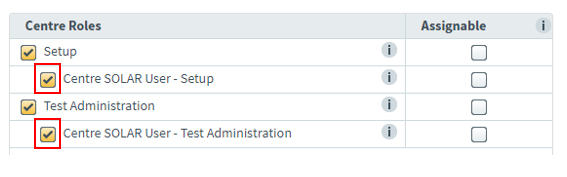
Under Centre Roles select the checkboxes next to Centre SOLAR User – Setup and Centre SOLAR User – Test Administration.
-
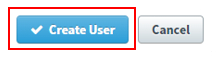
Select Create User.
-
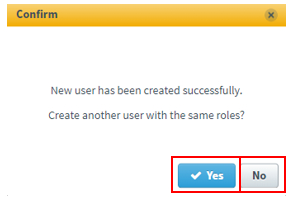
A message will confirm that the new user has been created and you will be asked if you want to create another user with the same roles. Select ‘Yes’ to create another user or ‘No’ to finish.
-
Each user you create will receive an email from noreply@surpass.com confirming their username and providing a link to set their password and security question. If a user has not received the email, ask them to check their junk or spam email folder. Additionally, check with your centre's technical staff or email provider to ensure noreply@surpass.com is permitted.
-
The user(s) you created will now be included in the list of users for your centre.

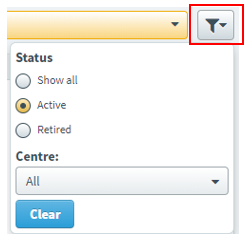
Show all users or find a user
-
Select Setup, then Users.
All users for your centre will be listed. -
Navigational arrows and a drop-down with page numbers will be available at the bottom of the screen if there is more than one page of users.

-
Use the search box to find a user or the drop-down menu to change the order of displayed users.

-
Use the filter drop-down menu to display all, active, or retired users at your centre.
Edit or retire a user
-
Select Setup, then Users.
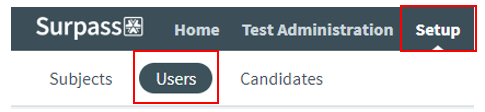
-
Find the user you want to edit from the list of users. Once selected, the user will be highlighted in orange.

-
Use the search box to find a user or the drop-down menu to change the order of displayed users if required.

-
Navigational arrows and a drop-down with page numbers will be available at the bottom of the screen if there is more than one page of users.
-
Select Edit in the User Details box.
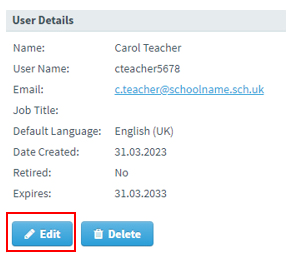
-
You can edit the user’s First Name, Last Name and Email, but the User name cannot be changed. To retire a user, select the checkbox next to Retired.
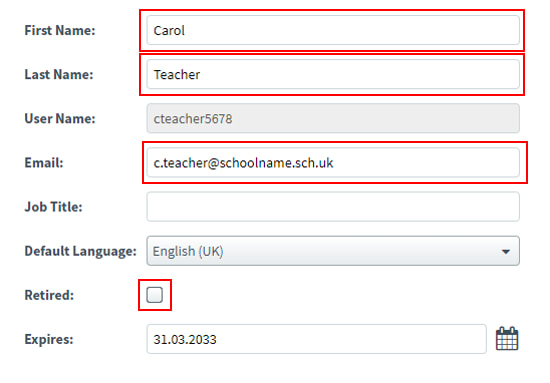
-
Select Save Changes.

-
Retired users will no longer appear from your active user list and cannot access SOLAR.
-
You cannot modify your own user details. If you need to update your information, please contact our Digital Services Support Helpdesk.